Podcasting Tutorials
- Mark Gallimore
- Tyler Kron-Piatek
A podcast is a series of digital files often made available for download, syndicated and serially organized on the web. This guide show you how to use podcast equipment available to you at Canisius College. It does not comprehensively cover how to use Digital Audio Workstation (DAW) software such as GarageBand or Audacity (although there are links to support documents for these below.) Nor does it walk through every step of uploading these files to the web, since that will depend on how you choose to host. But it will show you how to use the equipment in the mobile podcasting kits available in Bouwhuis Library, together with your own laptop (Windows PC or Macbook), to record digital audio files that are the substance of a podcast.
Before recording anything you wish to upload as a podcast, you need to experiment with the podcasting gear and your DAW to get optimal recording. If your recording doesn't sound good, it may not be possible to make it better using software. So budget time to optimize the podcast setup.
Also, when using the mobile kits, find a spot that's particularly quiet. Lots of background noise can make for a poor-quality recording. An empty classroom, or library study room are just two examples of good recording spaces.
What You Need
A Laptop PC
A podcast is a series of a digital audio files, and if you wish to use podcasting equipment at Canisius, you will need a laptop computer with a Digital Audio Workstation (DAW) software package installed. Either Mac or PC will work.
Digital Audio Workstation (DAW)
It's possible to use a simple audio recorder application to collect an audio signal that you save as an audio file (.wav, .mp3), but generally you want to use software that allows you to monitor the quality of the audio input, and do some basic edits. A good choice for Mac is Garageband, and for PC, Audacity. Both are free. Other apps are available as well.
Whichever DAW you choose, spend some time learning to use it. The podcasting kits will enable a quality recording, but if they are currently not available to you, you can still learn to use your DAW without a fancy microphone or speakers. A simple microphone, such as headset or even the laptop's internal microphone can be used just to generate audio for experimentation and learning.
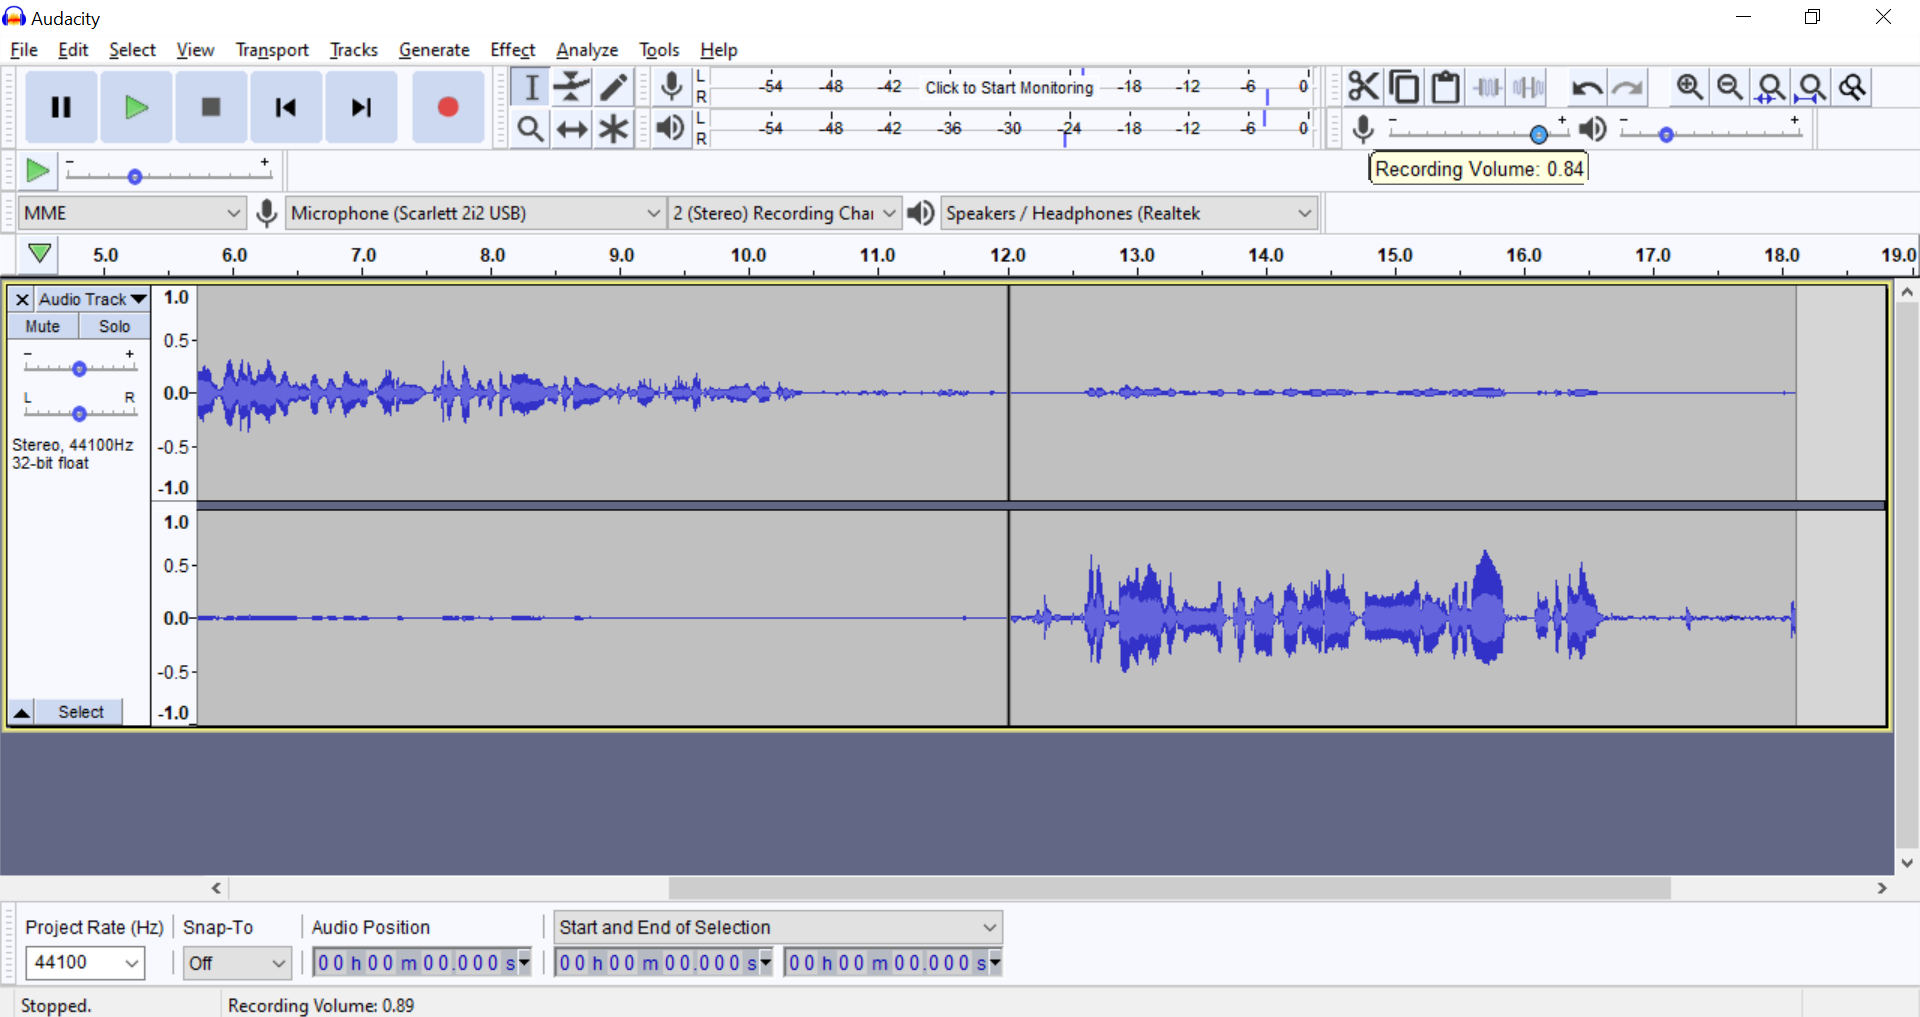
DAWs are more or less complex, and some include sophisticated post-production tools that can enhance the quality of your recording. But basically any DAW has multiple volume controls, for both microphone input and speaker output. In the example below, you see Audacity running on a Windows 10 laptop. It has a dropdown menu showing the microphone input (in this case a Scarlett 2i2 USB audio interface). In the upper right, there are volume sliders for the microphone gain (currently set to 0.84) and speaker output.
Mobile Kits
We have several mobile kit options, of varying complexity. In general, all allow for one- or two-person recording. Some of the kits have two microphones and an interface mobule, together with necessary cables. One of the kits consists solely of a single Blue Yeti microphone.
In most of the kits, you have an interface module, either a Focusrite 2i2 or H4N. The instructions for these are below,
You will have two microphones and accompanying stands. Plug the microphones into the Focusrite or H4N interface using the included XLR cables.
Focusrite 2i2 Scarlett
2i2 Scarletts convert analog audio signal or signals from one or two microphones into a digital signal delivered to a DAW on a computer. They have a lot of sophisticated features for musicians for but podcasting, 2i2s are simple:
- plug the kit microphones into the 2i2 using the XLR cables,
- plug in the monitor headphones.
- Adjust the gain on each microphone, and the monitor headphones. You should hear yourself/selves through the monitor headphones.

Each kit should contain two XLR cables, one for each microphone. These carry the audio signal from the microphones to the 2i2 interface.
Then, you can plug the Focusrite 2i2's USB connector into your computer. Whether you use Mac or PC, you probably have several steps to perform so you can identify the 2i2 as the input/microphone source, and adjust the volume within your DAW. (See "2i2 With Your DAW" below.)
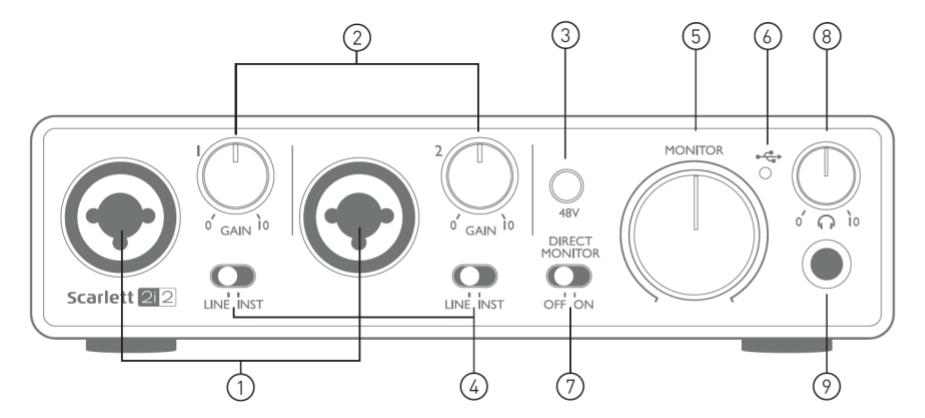
For the microphones in the kit, phantom power (48v) is not needed. Nor are instrument (INST) or classic ISA preamps (AIR), so these can be turned off.
2i2 Second Generation
|
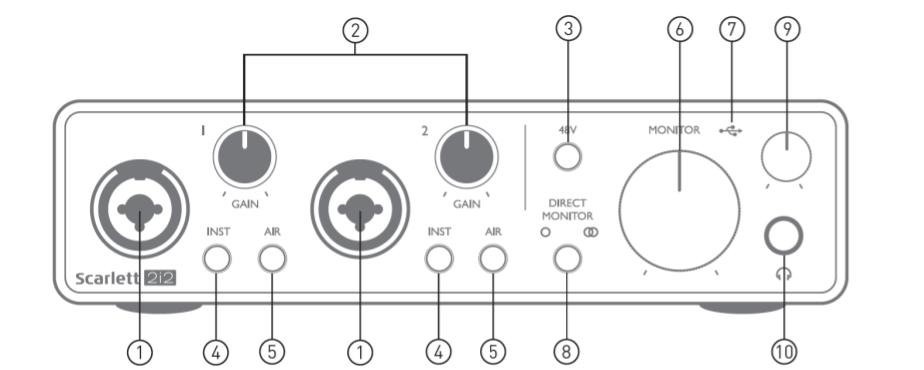
One of our mobile podcast kits uses a 2nd generation 2i2, and the other kit uses a 3rd generation 2i2. But for podcasting the 2i2s work the same. The 2i2 do not have a separate power supply, but instead draw power from your laptop, through the USB cable. Plug the USB cable into the back of the 2i2, and your laptop. You will likely want your laptop plugged into AC power. 1. Plug the Microphone XLR cables in to the XLR jacks. 2. Adjust the microphone gain (volume) using these knobs. 3. 4. 5. These are not needed. You can turn or leave them off. 9. Plug the monitor headphones in here. 7. (2nd Gen) or 8. (3rd Gen) Be sure to turn on the monitor headphones. 10. Use this knob to adjust the monitor volume. Even if you haven't done anything with software on your laptop, if the 2i2 is plugged into and drawing power from your PC, you should be able to hear your voice from the microphones, through the monitor headphones. |
2i2 3rd Generation
|
User Guides
The Focusrite 2i2s can use, but do not require software called Focusrite Control. But for podcasting, this software is not necessary. It is enough to simply choose the Focusrite as a USB input, in order to use them with your laptop.
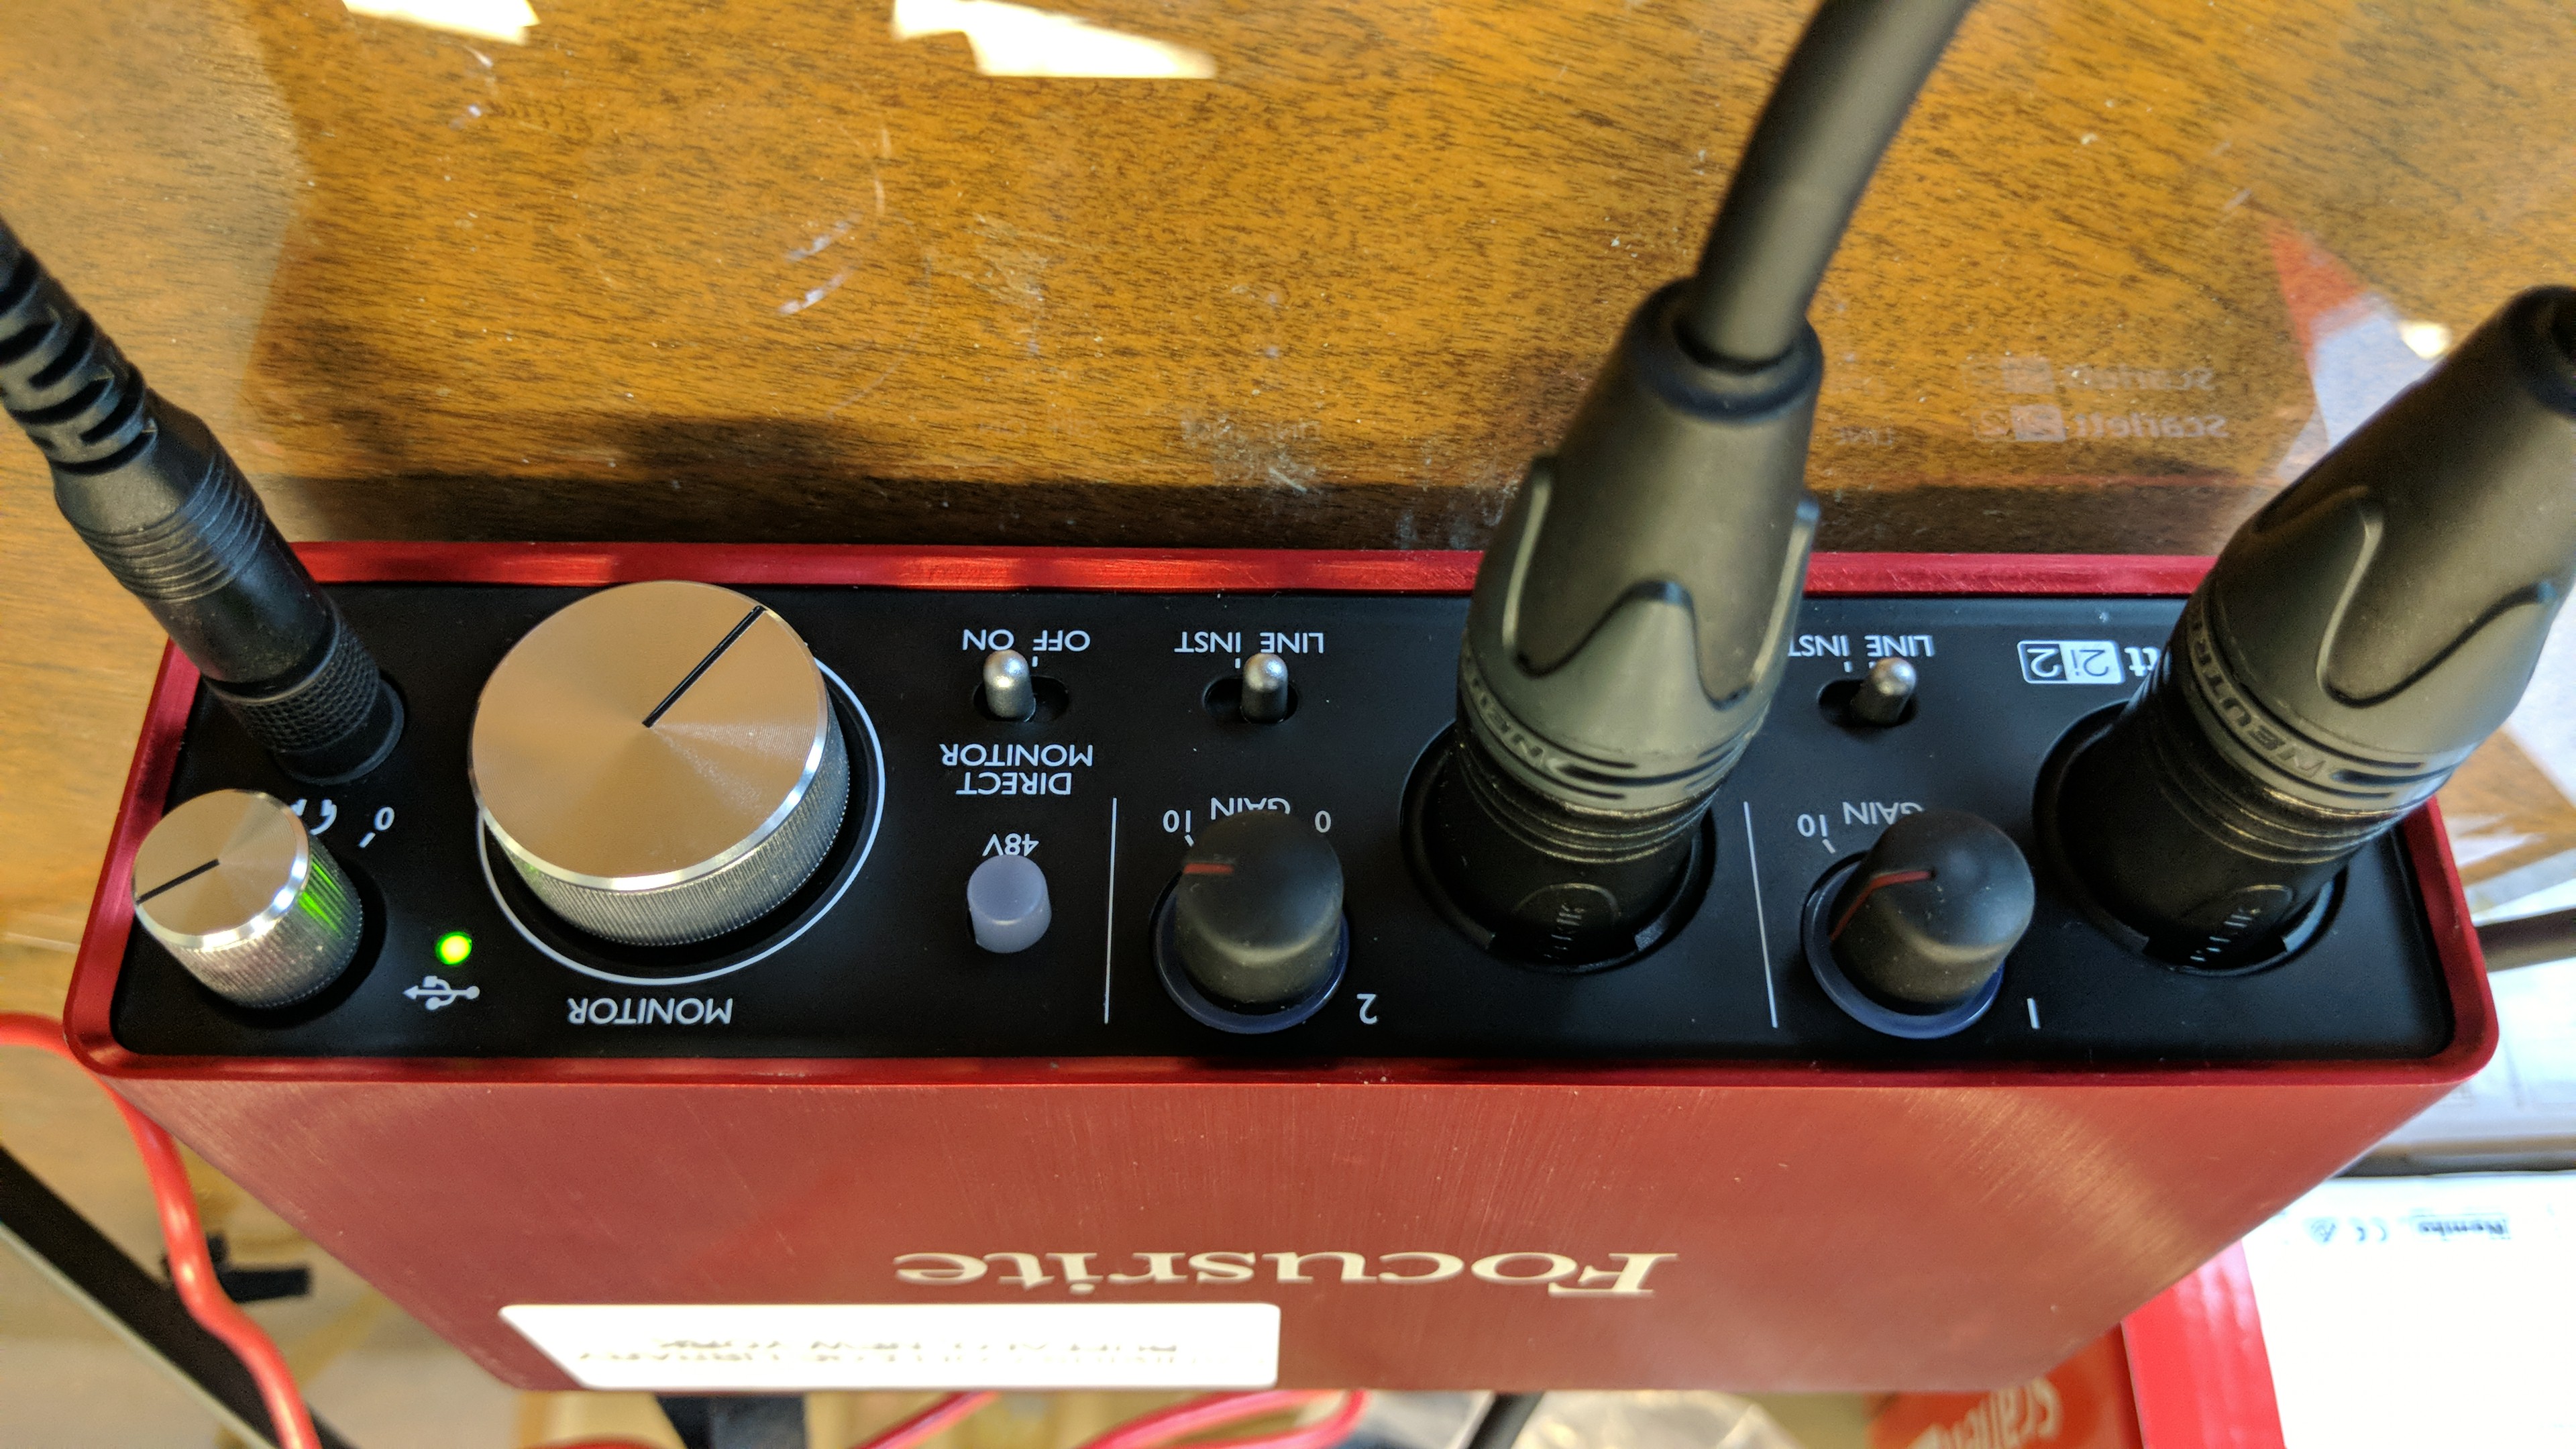
In the above image, this Focusrite 2i2 2nd Gen Interface is set up and ready to record.
2i2 With Your DAW
Audacity has a limited number of features when using a Focusrite 2i2, but these work very well.
On a Macbook, GarageBand can do more with the Focusrite 2i2 than Audacity can. There's two basic ways you can use Garageband with the 2i2s.
Microphones and Headphones in Kits
The podcast kits are supplied with Rode Podmics or SM 58s. These dynamic microphones are excellent for spoke-word recording, such as podcasts. They are tightly focused, so volume drops off sharply as you move your mouth away from the top of the microphone. However they are quite sensitive, so they pick up background noise very easily.
Kits with interface modules also include monitor headphones. This are excellent for judging how good your recording sounds. You can plug them into the interface module to detect whether or not the interface is working properly, or if the problem is further up the line in your laptop. You can also plug them directly into your laptop, to listen to the sample or finished recordings. If you have your own pair of headphones, this can be handy since you can use both headphone pairs to quickly monitor the interface, and the recordings in your laptop.
The headphones supplied with the kits have a jack adapter. The smaller jack is typically appropriate for plugging into your laptop but you may need the adaptor to plug into the interface.
Blue Yeti Mic
The Blue Yeti is the simplest podcasting unit available at Canisius,. It is a single microphone that is ideal for solo podcasts, and can respectably pick up two voices (participants sitting across from one another) in a quiet setting. Simply plug in the microphone directly to your laptop with the supplied USB cable, set the appropriate pattern, adjust the volume, and try out a few test recordings. You do not need an interface like the 2i2 Scarlett or Zoom H4N.
In your DAW, you will identify a USB source as your input.
While the Blue Yeti does a decent job of picking up two voices, recognize that it probably won't be as clean or effective in getting two separate voices as our other kits or our studio, especially if the participants are seated comfortably.
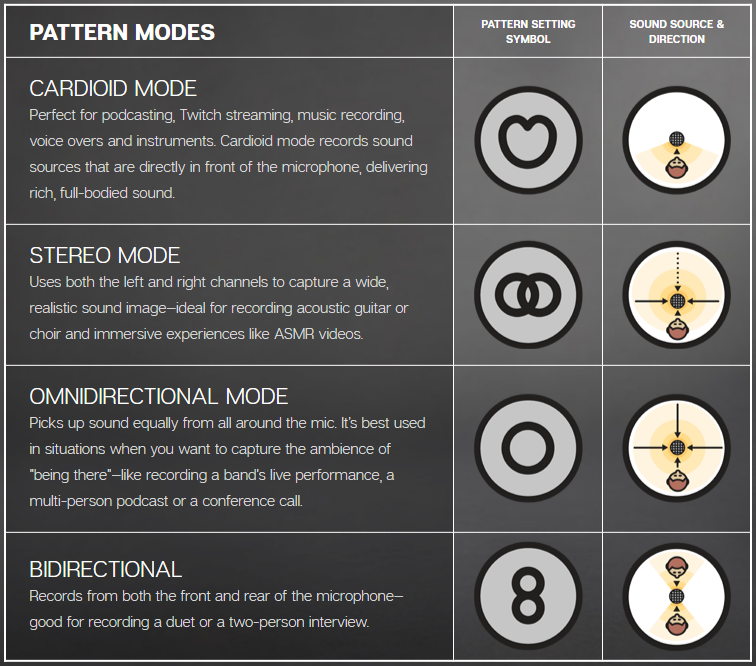
Click the accompanying chart to see how each of the Blue Yeti's patterns work. And when speaking into the Blue Yeti, be sure that you are facing it from the right angle.
Zoom H4N Recorder/Interface
One of our mobile podcasting kits is equipped with a Zoom H4N recorder. This allows you to record either directly to your laptop, similar to the Focusrite 2i2s above, or record to the H4N, which means you do not need a laptop with you at the time and place of recording.
See our Zoom H4N instructions here.
Digital Media Laboratory Studio (OM 402)
For podcasts requiring three or four microphones, the COLI Digital Media Laboratory (DML) is available on a limited basis. Please contact the Center for Online Learning & Innovation to discussion possibly using the studio.
You can power up the mixer and all microphones very simply, by pressing the power switch located in the short rack next to the main table:

(click to expand the image)
The DML takes advantage of the Zoom PodTrak P8, a mixer that allows full control of microphone volume and sound effects.
ZoomPodTrak_P8_QuickGuide_2.pdf
ZoomPodtrak_P8_FullOperationManual.pdf
Additional Support and Tutorials
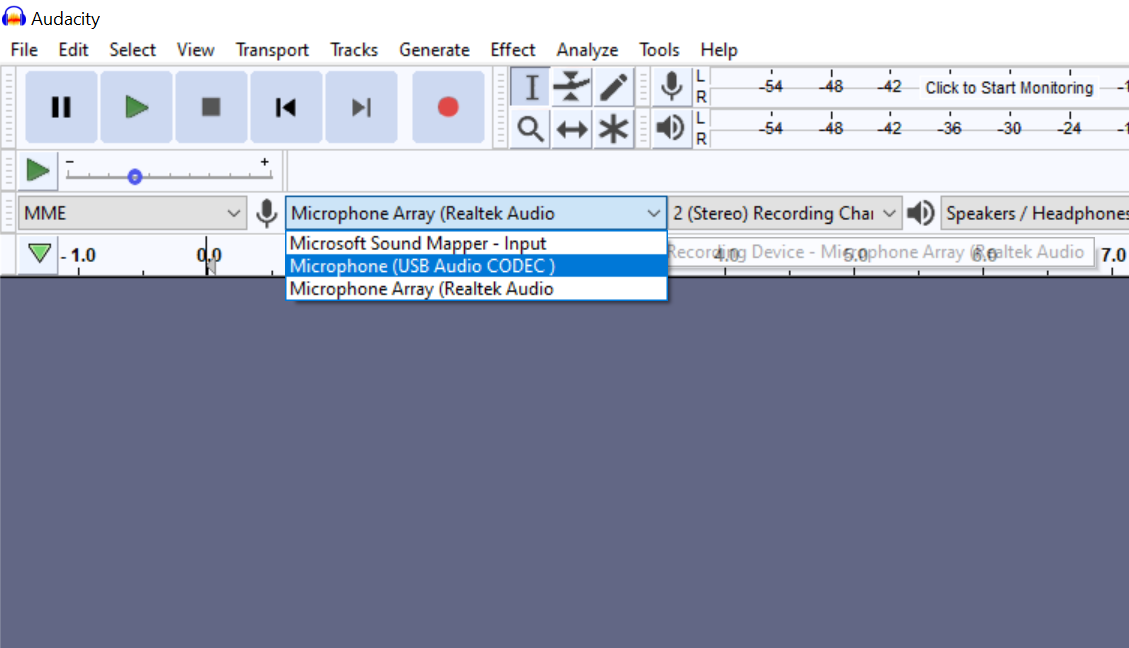
Within the DML, audio is captured through a Zoom P8 mixer that sends a single-track USB signal to your laptop-based DAW. Plug the P8's USB cable to your laptop. Then, open Audacity, and you may see that options for the microphone or Recording Device include something like "USB Audio CODEC" or "ZOOM P8 Audio" source in your DAW. Choose this, and you have now selected to receive audio from the podcast room's microphone set.

Next, ensure that the microphones you wish to use are on air and the gain is sufficiently high. The P8 mixer allows adjustments to each microphone's sound. In the example here, the ZOOM P8 is optimized for microphones 3 and 4, and ready to record. Other microphone inputs are off air, which can minimize background noise.

When you have a sound setup that is optimal, photograph the mixer with your phone so you can easily reproduce that particular setup.
Reserve the Digital Media Laboratory Podcast Room
Not Meeting in Person? Try Zoom!
If you are not able to meet in person, Zoom has several options that you can turn on to get a great Audio recording. So long as both yourself and/or your interviewee(s) have good microphones, it will (almost) sound as if you were both using the professional-grade hardware!
Check out Riverside FM's tutorial on setting up Zoom for Podcasting:
https://riverside.fm/blog/zoom-podcast-and-alternatives
In general, most microphones in-built on laptops will be fine. However, if you want more professional audio, here are the microphones that we recommend:
Recording Your Podcast
Find a good spot to record. This should be free of background noise, such as conversation, traffic, doors opening and closing, TVs, and so on. Smaller rooms are often better because they avoid echo. If you really want professional-grade sound, try hanging some blankets up around you, to soak up echo. You can even drape a blanket over a big table, and sit under it to record!
If you hitch the gear together, and quickly record your first audio track, you may not be happy with the result. Instead, spend some time recording some test tracks, where you try out different gain (volume) settings, or in the case of the mixer, other effects. Make certain participants sound loud and clear, each through their own microphone.
Once you've recorded a podcast or two, setting up will be a quick process. But if you are going to the trouble to record audio, make sure it sounds good!
The Finished File: Export as MP3
You use DAWs and the recording hardware to essentially produce one thing: a digital audio file or set of files that has your, and your participants' voices coming through loud and clear. In DAWs such as Audacity and GarageBand, you save a project, not a finished file. That project may combine several files (your voice recording, and perhaps intro music or other audio clips.) You Export the finished file that is the file you upload to the web. An excellent format for this is mp3, which is a good balance of size (compression) and quality.
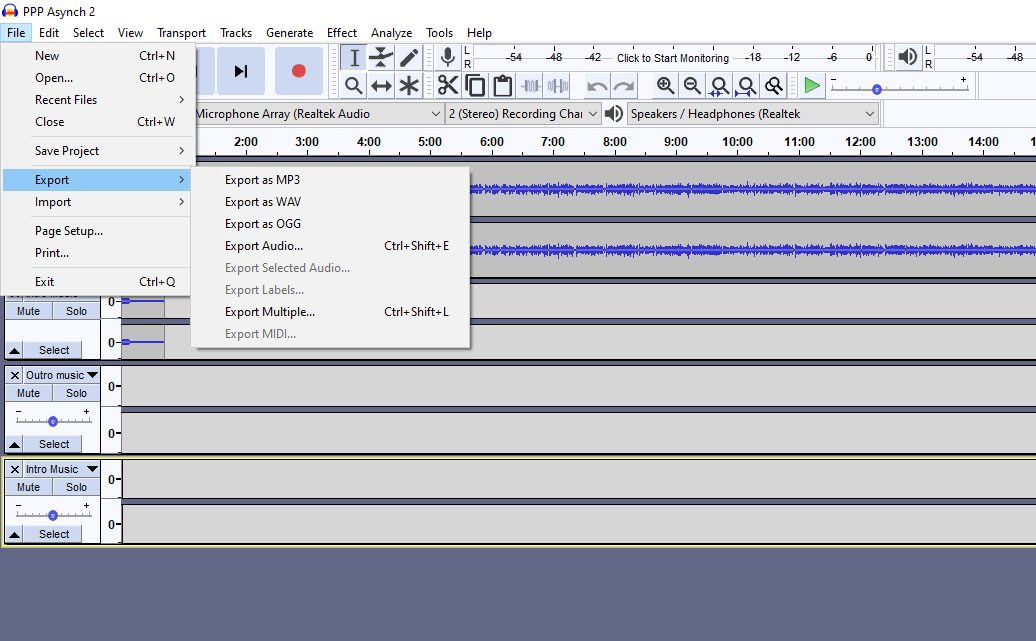
In the above example, the podcaster could save the project to disk in a file format specific to Audacity. Instead, he will opt to "Export as MP3," which is a great choice for publishing his podcast episode. Similar to a lot of digital creative work, a project file (or files) are the working files that can be easily modified or edited. These may be a set of audio clips, or contain audio that has been cut out of the track but is still saved in case the podcaster wished to bring them back. Meanwhile, an exported file such as an .mp3 represents the finished audio file, or in this case, podcast episode. Although it could be edited, it is published as a single file and so some editing options are no longer possible. But this file is optimized for upload as a podcast episode.
Hosting Podcasts, and Directories
A podcast is a collection of audio files, but to make it available to other people you need to make it available on the web for streaming and download.